
John Deere 755K Crawler Loader Repair Technical Manual (TM14326X19)
Complete Repair Service Technical Manual for John Deere 755K Crawler Loader, with all the shop information to maintain, repair, and rebuild like professional mechanics.
John Deere 755K Crawler Loader workshop technical manual (repair) includes:
* Numbered table of contents easy to use so that you can find the information you need fast.
* Detailed sub-steps expand on repair procedure information
* Numbered instructions guide you through every repair procedure step by step.
* Notes, cautions and warnings throughout each chapter pinpoint critical information.
* Bold figure number help you quickly match illustrations with instructions.
* Detailed illustrations, drawings and photos guide you through every procedure.
* Enlarged inset helps you identify and examine parts in detail.
TM14326X19 - John Deere 755K Crawler Loader Repair Technical Manual.pdf
tm14326x63 - John Deere 755K Cargadora sobre orugas.pdf
tm14326x28 - John Deere Chargeur chenillé 755K.pdf
PRODUCT DETAILS:
Total Pages: 833 pages
File Format: PDF/EPUB/MOBI/AZW (PC/Mac/Android/Kindle/iPhone/iPad; bookmarked, ToC, Searchable, Printable)
Language: English Spanish French
Category: Repair
Published on 2020/02/02
John Deere - Crawler - 1T0755KX_ _F339207—
TABLE OF CONTENTS....1
Section 00: General Information....13
Group 0001: Safety....13
Recognize Safety Information....17
Follow Safety Instructions....18
Operate Only If Qualified....19
Wear Protective Equipment....20
Protect Against Noise....21
Avoid Unauthorized Machine Modifications....22
Inspect Machine....23
Stay Clear of Moving Parts....24
Avoid High-Pressure Fluids....25
Avoid High-Pressure Oils....26
Work In Ventilated Area....27
Avoid Static Electricity Risk When Refueling....28
High Debris Applications....30
Prevent Fires....31
In Case of Machine Fire....32
Prevent Battery Explosions....33
Handle Chemical Products Safely....34
Handle Starting Fluid Safely....35
Decommissioning — Proper Recycling and Disposal of Fluids and Components....36
Exhaust Filter Ash Handling and Disposal....37
Prepare for Emergencies....38
Clean Debris from Machine....39
Add Cab Guarding for Special Uses....40
Use Steps and Handholds Correctly....41
Start Only From Operator's Seat....42
Use and Maintain Seat Belt....43
Prevent Unintended Machine Movement....44
Avoid Work Site Hazards....45
Keep Riders Off Machine....47
Avoid Backover Accidents....48
Avoid Machine Tip Over and Machine Damage....49
Avoid Power Lines....51
Use Special Care When Operating....52
Inspect and Maintain ROPS....53
Travel Safely....54
Prevent Acid Burns....55
Add and Operate Attachments Safely....57
Park and Prepare for Service Safely....58
Service Machines Safely....59
Service Cooling System Safely....60
Service Accumulator Systems Safely....61
Remove Paint Before Welding or Heating....62
Make Welding Repairs Safely....63
Drive Metal Pins Safely....64
Use Proper Lifting Equipment....65
Clean Exhaust Filter Safely....66
Group 03: Torque Values....14
Metric Bolt and Cap Screw Torque Values....71
Additional Metric Cap Screw Torque Values....73
Unified Inch Bolt and Cap Screw Torque Values....75
Service Recommendations for 37° Flare and 30° Cone Seat Connectors....77
Service Recommendations for O-Ring Boss Fittings....79
O-Ring Boss Fittings In Aluminum Housing Service Recommendations—Excavators....81
Service Recommendations for Flared Connections—Straight or Tapered Threads....84
Service Recommendations For Flat Face O-Ring Seal Fittings....86
O-Ring Face Seal Fittings With SAE Inch Hex Nut And Stud End For High Pressure Service Recommendations....88
O-Ring Face Seal Fittings With Metric Hex Nut And Stud End For Standard Pressure Service Recommendations....90
O-Ring Face Seal Fittings With Metric Hex Nut And Stud End For High Pressure Service Recommendations....93
Service Recommendations for Metric Series Four Bolt Flange Fitting....96
Service Recommendations For Inch Series Four Bolt Flange Fittings....98
Inch Series Four Bolt Flange Fitting For High Pressure Service Recommendations....100
Service Recommendations For Non-Restricted Banjo (Adjustable) Fittings....102
Service Recommendations For O-Ring Boss Fittings With Shoulder....105
Metric 24° O-Ring Seal DIN 20078 Service Recommendations....108
Section 01: Tracks....112
Group 0130: Track System....112
Welding on Machine....605
Track Guides and Rock Guards Remove and Install....116
Carrier Roller Wear Inspection....120
Carrier Roller Remove and Install....121
Carrier Roller Disassemble and Assemble....123
Metal Face Seal Inspection....129
Carrier Roller Leakage Test....131
Track Roller Wear Inspection....133
Track Roller Remove and Install....135
Track Roller Disassemble and Assemble....137
Track Roller Leakage Test....148
Track Grouser Wear Inspection....151
Track Shoe Remove and Install....152
Crossbar Remove and Install....154
Crossbar Bushings and Seals Remove and Install....160
Pivot Shaft Remove and Install....163
Pivot Shaft Disassemble and Assemble....165
Track Link Height Inspection....167
Bushing Outside Diameter for Lubricated Track Chain Inspection....168
Track Pitch for Lubricated Track Chain Inspection....170
Track Chain Remove and Install....171
Lubricated Track Chain to Turn Pins and Bushings and Not Lubricate Disassemble and Assemble....176
Lubricated Track Chain to Turn Bushings and Lubricate Chain Disassemble....184
Lubricated Track Chain to Turn Bushings and Lubricate Chain Assemble....188
Track Adjuster Cylinder and Recoil Spring Remove and Install....197
Track Adjuster Recoil Spring Disassemble and Assemble....199
Track Adjuster Cylinder Disassemble and Assemble....208
Track Frame Remove and Install....212
Front Idler Wear Inspection....218
Front Idler Remove and Install....219
Front Idler Disassemble and Assemble....227
Front Idler Adjustment....237
Front Idler Leakage Test....243
Sprocket Segment Remove and Install....245
Section 02: Axles and Suspension Systems....247
Group 0201: Drive Axle Housing and Support....247
Final Drive Remove and Install....254
Group 0250: Axle Shaft, Bearings and Reduction Gears....247
Planet Carrier Remove and Install....262
Planet Carrier Disassemble and Assemble....264
Ring Gear and Hub Remove and Install....266
Ring Gear and Hub Disassemble and Assemble....268
Final Drive Metal Face Seal Remove and Install....270
Inner Final Drive Housing Remove and Install....278
Inner Final Drive Housing Cover Disassemble and Assemble....281
Final Drive Seal Leakage Check....288
Section 03: Transmission....292
Group 0300: Remove and Install....292
Hydrostatic Pump and Motor Initial Start-Up Procedure....295
Hydrostatic Pump Remove and Install....297
Hydrostatic Motor Remove and Install....302
Group 0315: Control Linkage....292
Transmission Control Lever (TCL) Remove and Install....305
Transmission Control Lever (TCL) Adjustment (V-Pattern)....307
Decelerator/Brake Pedal Remove and Install....309
Decelerator/Brake Pedal Disassemble and Assemble....310
Steering Pedal Remove and Install....317
Steering Pedal Disassemble and Assemble....319
Group 0325: Input Drive Shafts and U-Joints....292
Damper Drive Remove and Install....323
Group 0360: Hydraulic System....292
Hydraulic Component Failure Cleanup Procedure....703
Hydrostatic Pump Disassemble....331
Charge Pump Disassemble and Assemble....345
Pump Displacement Control Valve (PDCV) Disassemble and Assemble....351
Multi-Function Valve Remove and Install....353
Multi-Function Valve Disassemble and Assemble....355
Hydrostatic Pump Assemble....359
Hydrostatic Motor Disassemble....379
Hydrostatic Motor Assemble....390
Hydraulic Integrated Circuit (HIC) Valve Remove and Install....405
Hydraulic Integrated Circuit (HIC) Valve Disassemble and Assemble....409
Hydrostatic Reservoir Remove and Install....413
Hydrostatic Cold Start Valve Remove and Install....418
Section 04: Engine....420
Group 0400: Removal and Installation....420
John Deere Engine....422
Engine Remove and Install....423
Engine Mounts Remove and Install....429
Section 05: Engine Auxiliary Systems....431
Group 0505: Cold Weather Starting Aid....431
Engine Coolant Heater Remove and Install....435
Group 0510: Cooling System....431
Cooling Package Plenum Remove and Install....441
Cooling Package Remove and Install....445
Charge Air Cooler Remove and Install....452
Radiator Remove and Install....454
Hydraulic Oil Cooler Remove and Install....458
Hydrostatic Oil Cooler Remove and Install....461
Fuel Cooler Remove and Install....464
Group 0520: Intake System....431
Air Cleaner Remove and Install....467
Precleaner Remove and Install—If Equipped....469
Group 0530: External Exhaust Systems....431
Exhaust Tube Remove and Install....472
Exhaust Filter Remove and Install....474
Diesel Oxidation Catalyst (DOC) Remove and Install....477
Diesel Particulate Filter (DPF) Remove and Install....479
Service Filter Cleaning....481
Aftertreatment Assembly Remove and Install....482
Selective Catalyst Reduction (SCR) Remove and Install....486
Diesel Exhaust Fluid (DEF) Tank Remove and Install....489
Diesel Exhaust Fluid (DEF) Tank Header Remove and Install....491
Diesel Exhaust Fluid (DEF) Tank Header Disassemble and Assemble....493
Diesel Exhaust Fluid (DEF) Tank Cleaning Procedure....496
Diesel Exhaust Fluid (DEF) Dosing Unit Remove and Install....498
Diesel Exhaust Fluid (DEF) Dosing Injector Remove and Install....500
Diesel Exhaust Fluid (DEF) Decomposition Tube Remove and Install....502
Group 0560: External Fuel Supply Systems....431
Fuel Tank Remove and Install....507
Primary Fuel Filter and Water Separator Remove and Install....511
Final Fuel Filter Remove and Install....513
Auxiliary Fuel Filter and Water Separator Remove and Install—If Equipped....515
Section 11: Park Brake....517
Group 1100: Park Brake....517
Park Brake Remove and Install....520
Group 1115: Control Linkage....517
Park Lock Lever Remove and Install....524
Park Lock Lever Disassemble and Assemble....526
Group 1160: Hydraulic System....517
Park Brake Disassemble and Assemble....538
Section 15: Equipment Attaching....546
Group 1511: Drawbar....546
Retrieval Clevis Remove and Install....548
Retrieval Hitch Remove and Install—If Equipped....549
Section 16: Electrical System....550
Group 1600: Removal and Installation....550
Exhaust Filter Sensor Installation....552
Rotary Sensor Remove and Install....553
Air Conditioner Freeze Control Switch Remove and Install....555
Controller Remove and Install....560
Installation of Repair Wire Assembly (RWA)....561
Replace (Pull-Type) Metri-Pack® Connectors....570
Replace (Push-Type) Metri-Pack® Connectors....572
Replace Metri-Pack® Connectors....573
Replace Weather Pack™ Connector....575
Install Weather Pack™ Contact....577
Replace DEUTSCH® Rectangular or Triangular Connectors....579
Replace DEUTSCH® Circular Connectors....581
Replace DEUTSCH® Connectors....583
Install DEUTSCH® Contact....585
Replace Cinch™ Connectors....587
Install Cinch™ Contact....589
Repair 32 and 48-Way Cinch™ Connectors....591
Remove Connector Body From Blade Terminals....596
Repair Molex Connectors....597
Replace TYCO™ Connectors....600
Section 17: Frame or Supporting Structure....602
Group 1740: Frame Installation....602
Welding on Machine....605
Group 1746: Frame Bottom Guards....602
Bottom Guards Remove and Install....609
Group 1749: Chassis Weights....602
Rear Counterweight Remove and Install....613
Section 18: Operator’s Station....615
Group 1800: Removal and Installation....615
Cab Remove and Install....623
Group 1810: Operator Enclosure....615
Windowpanes Remove and Install....633
Wiper Motor Remove and Install....636
Washer Pump Remove and Install....640
Hand Pump Bleed Procedure....641
Group 1821: Seat and Seat Belt....615
Seat Remove and Install....644
Seat Belt Remove and Install....646
Group 1830: Heating and Air Conditioning....615
R134a Refrigerant Cautions and Proper Handling....649
R134a Refrigerant Oil Information....650
R134a Refrigerant Recovery, Recycling, and Charging Station Installation Procedure....652
Recover R134a System....654
Flush and Purge Air Conditioning System....656
Evacuate R134a System....659
Charge R134a System....661
Evaporator or Heater Core Remove and Install....663
Expansion Valve Remove and Install....668
Cab Heater Blower Motor and Blower Motor Speed Resistor Remove and Install....670
Cab Upper Heater Components....673
Under Seat Heater Disassemble and Assemble....675
Receiver-Dryer Remove and Install....678
Condenser Remove and Install....680
Compressor Remove and Install....682
Section 19: Sheet Metal....684
Group 1910: Hood and Engine Enclosures....684
Hood Remove and Install....687
Engine Side Door Assembly Remove and Install....689
Group 1921: Grille and Grille Housing....684
Grille Remove and Install....693
Section 20: Safety and Convenience....694
Group 2004: Horn and Warning Devices....694
Backup Alarm Remove and Install....696
Rear Camera Remove and Install....697
Section 21: Vehicle Main Hydraulic System....698
Group 2160: Hydraulic System....698
General Oil Cleanup Procedure....701
Hydraulic Component Failure Cleanup Procedure....703
Hydraulic Pump Remove and Install....706
Hydraulic Fan Motor Remove and Install....709
Hydraulic Fan Pump Remove and Install....713
Hydraulic Fan Reversing Valve Remove and Install....715
Hydraulic Fan Reversing Valve Disassemble and Assemble....717
Hydraulic Reservoir Remove and Install....719
Hydraulic Reservoir Cleanout Cover Remove and Install....725
Thermal Bypass Valve Remove and Install....729
Section 31: Loader....731
Group 3102: Bucket....731
NeverGrease™ Pin Joints....736
Standard and Multipurpose Bucket Remove and Install....740
Multipurpose Bucket and Lines Disassemble and Assemble....750
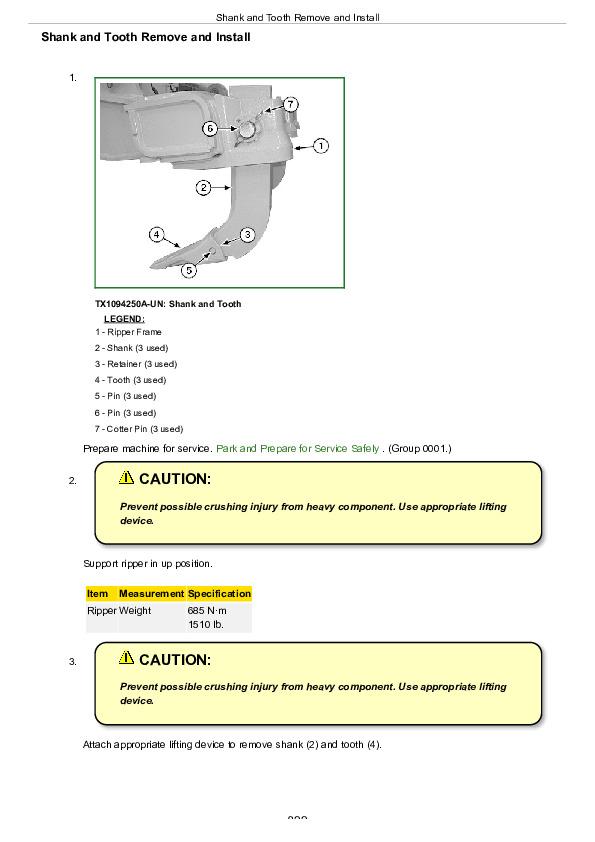
Shank and Tooth Remove and Install....822
Cracked Cutting Edge Repair....755
Group 3140: Frames....731
Boom Remove and Install....768
Boom Bushings and Seals Remove and Install....780
Group 3160: Loader Hydraulic System....731
Hydraulic Control Valve Remove and Install....786
Hydraulic Control Valve Disassemble and Assemble....790
System Relief Valve Remove and Install....799
Pilot Control Valve Remove and Install....801
Bucket Cylinder Remove and Install....804
Bucket Cylinder Disassemble and Assemble....807
Boom Cylinder Remove and Install....808
Boom Cylinder Disassemble and Assemble....810
Loader Start-Up Procedure (Hydraulic Cylinder Bleed Procedure)....811
Multipurpose Bucket Cylinder Disassemble and Assemble....812
Section 42: Ground Conditioning Tool....813
Group 4200: Remove and Install....813
Ripper Remove and Install—If Equipped....817
Group 4201: Blades, Teeth, and Shanks....813
Shank and Tooth Remove and Install....822
Group 4260: Hydraulic System....813
Auxiliary Control Valve Disassemble and Assemble....825
Ripper Pilot Control Valve Remove and Install....826
Ripper Cylinder Remove and Install....828
Ripper Cylinder Disassemble and Assemble....833
Section 9900: Dealer Fabricated Tools....834
Group 9900: Dealer Fabricated Tools....834
DFT1261 Rolling Torque Measurement Tool....836
DFT1302 Final Drive Pressure Test Adapter....837
DFT1380 Lift Bracket....838
DFT1383 Lifting Bracket....843
John Deere 755K Crawler Loader Repair Technical Manual (TM14326X19)
![]()