
Caterpillar 311C Excavator Repair Service Manual
Complete service repair manual with Electrical Wiring Diagrams for Caterpillar 311C Excavator, with all the technical information to maintain, diagnose, repair, and rebuild like professional mechanics.
Caterpillar 311C Excavator workshop service repair manual includes:
* Numbered table of contents easy to use so that you can find the information you need fast.
* Detailed sub-steps expand on repair procedure information
* Numbered instructions guide you through every repair procedure step by step.
* Troubleshooting and electrical service procedures are combined with detailed wiring diagrams for ease of use.
* Notes, cautions and warnings throughout each chapter pinpoint critical information.
* Bold figure number help you quickly match illustrations with instructions.
* Detailed illustrations, drawings and photos guide you through every procedure.
* Enlarged inset helps you identify and examine parts in detail.
RENR5535 - Schematic (311C U Excavator Hydraulic System).pdf
RENR5536 - Disassembly and Assembly (311C Excavator Machine Systems).pdf
RENR5537 - Schematic (Caterpillar 311C U Excavator Electrical System).pdf
RENR5557 - Systems Operation (311C and 314C Excavators Electric and Electronic).pdf
RENR5557 - Testing and Adjusting (311C and 314C Excavators Electric and Electronic).pdf
PRODUCT DETAILS:
Total Pages: 1,032 pages
File Format: PDF (Internal Links, Bookmarked, Table of Contents, Searchable, Printable, high quality)
Language: English
TABLE OF CONTENTS
RENR5535 - Schematic (311C U Excavator Hydraulic System)...2
RENR5536 - Disassembly and Assembly (311C Excavator Machine Systems)...35
Duo-Cone Conventional Seals - Install...40
Hydraulic System Pressure - Release...53
Blade Cylinder - Remove and Install...55
Blade - Remove and Install...62
Bucket - Remove...68
Bucket - Install...70
Bucket Linkage Bearings and Seals - Remove...73
Bucket Linkage Bearings and Seals - Install...76
Bucket Cylinder - Remove and Install...79
Stick Cylinder - Remove and Install...87
Stick - Remove...94
Stick Bearings and Seals - Remove...98
Stick Bearings and Seals - Install...100
Stick - Install...103
Boom Cylinder - Remove and Install...106
Boom - Remove...114
Boom Bearings and Seals - Remove...119
Boom Bearings and Seals - Install...121
Boom - Install...123
Window Wiper Motor - Remove and Install - Upper...127
Window Wiper Motor - Remove and Install - Lower...136
Cab - Remove...142
Cab - Install...147
Boom Lighting - Remove and Install...152
Counterweight - Remove and Install...154
Fuel Tank - Remove...158
Fuel Tank - Install...163
Check Valve (Slow Return) - Remove...168
Check Valve (Slow Return) - Disassemble...172
Check Valve (Slow Return) - Assemble...175
Check Valve (Slow Return) - Install...178
Check Valve (Cooler Bypass) - Remove...182
Check Valve (Cooler Bypass) - Disassemble...186
Check Valve (Cooler Bypass) - Assemble...188
Check Valve (Cooler Bypass) - Install...190
Handle (Joystick) - Remove and Install...194
Operator Console - Remove and Install...199
Seat - Remove and Install...215
Storage Box and Covers (Cab) - Remove and Install...218
Heating and Air Conditioning Unit - Remove...221
Heating and Air Conditioning Unit - Install...225
Refrigerant Receiver-Dryer - Remove and Install...229
Speed Control - Remove and Install - Blower Linear Control...232
Temperature Sensor (Ambient Air) - Remove and Install...234
Heater Core - Remove...237
Heater Core - Install...241
Evaporator Coil - Remove and Install...244
Pressure Switch (Refrigerant Pressure Cutoff) - Remove and Install...246
Track Carrier Roller - Remove...251
Track Carrier Roller - Install...254
Track Roller - Remove...256
Track Roller - Install...260
Track - Separate...263
Track - Connect...267
Front Idler and Recoil Spring - Remove...270
Recoil Spring - Disassemble...272
Recoil Spring - Assemble...277
Front Idler and Recoil Spring - Install...282
Track Adjuster - Remove...284
Track Adjuster - Disassemble...286
Track Adjuster - Assemble...288
Track Adjuster - Install...291
Final Drive Sprocket - Remove and Install...293
Final Drive and Travel Motor - Remove...297
Final Drive and Travel Motor - Disassemble...301
Final Drive and Travel Motor - Assemble...325
Final Drive and Travel Motor - Install...349
Swivel - Remove...352
Swivel - Disassemble...357
Swivel - Assemble...359
Swivel - Install...361
Swing Motor and Swing Drive - Remove...366
Swing Motor - Disassemble...371
Swing Motor - Assemble...381
Swing Drive - Disassemble...390
Swing Drive - Assemble...398
Swing Motor and Swing Drive - Install...406
Undercarriage Frame - Remove...410
Undercarriage Frame - Install...417
Swing Gear and Bearing - Remove and Install...424
Hydraulic Tank and Filter - Remove...429
Hydraulic Tank and Filter - Disassemble...435
Hydraulic Tank and Filter - Assemble...446
Hydraulic Tank and Filter - Install...457
Accumulator - Remove and Install...462
Gear Pump (Pilot) - Remove...465
Gear Pump (Pilot) - Disassemble...468
Gear Pump (Pilot) - Assemble...473
Gear Pump (Pilot) - Install...478
Gear Pump (Blade) - Remove...480
Gear Pump (Blade) - Disassemble...483
Gear Pump (Blade) - Assemble...490
Gear Pump (Blade) - Install...497
Pump Control - Remove...499
Pump Control - Disassemble...502
Pump Control - Assemble...507
Pump Control - Install...513
Main Hydraulic Pump - Remove...516
Main Hydraulic Pump - Disassemble...523
Main Hydraulic Pump - Assemble...532
Main Hydraulic Pump - Install...540
Pilot Valve (Joystick) - Remove...546
Pilot Valve (Joystick) - Disassemble...551
Pilot Valve (Joystick) - Assemble...557
Pilot Valve (Joystick) - Install...564
Pilot Valve (Blade) - Remove...569
Pilot Valve (Blade) - Disassemble...572
Pilot Valve (Blade) - Assemble...576
Pilot Valve (Blade) - Install...580
Pilot Valve (Travel) - Remove...582
Pilot Valve (Travel) - Disassemble...587
Pilot Valve (Travel) - Assemble...598
Pilot Valve (Travel) - Install...610
Pressure Reducing Valve - Remove and Install...614
Main Control Valve - Remove...620
Main Control Valve - Disassemble...626
Main Control Valve - Assemble...661
Main Control Valve - Install...693
Control Valve (Blade) - Remove...699
Control Valve (Blade) - Disassemble...702
Control Valve (Blade) - Assemble...712
Control Valve (Blade) - Install...722
Priority Valve (Boom) - Remove and Install...725
RENR5537 - Schematic (Caterpillar 311C U Excavator Electrical System)...732
Main...733
Collage...735
RENR5557 - Systems Operation (311C and 314C Excavators Electric and Electronic)...744
General Information...745
Electrical System...746
Monitoring System...761
Engine Control System...766
Basic Operation...777
RENR5557 - Testing and Adjusting (311C and 314C Excavators Electric and Electronic)...783
General Information...786
Service Tools...787
Harness and Wire Identification...788
Electrical System Troubleshooting...790
Starting Motor Does Not Rotate - Troubleshoot...793
Chassis Light Does Not Illuminate - Troubleshoot...804
Wiper Motor Does Not Rotate - Troubleshoot...812
Wiper Motor Does Not Stop - Troubleshoot...819
Window Washer Does Not Activate - Troubleshoot...823
Horn Does Not Sound - Troubleshoot...827
Dome Light Does Not Illuminate - Troubleshoot...833
Power to Switch Panel - Troubleshoot...838
Radio Does Not Activate - Troubleshoot...841
Radio Does Not Sound - Troubleshoot...845
High Speed Mode for Travel Does Not Activate - Troubleshoot...849
Service Hour Meter Does Not Activate - Troubleshoot...855
Indicators Do Not Illuminate and Action Alarm Does Not Sound - Troubleshoot...860
Indicators Do Not Illuminate - Troubleshoot...863
Panel Light for Monitor Does Not Illuminate - Troubleshoot...864
Indicator for Air Inlet Heater Does Not Illuminate - Troubleshoot...868
Alarm Indicator for Engine Oil Pressure Is Illuminated and Action Alarm Is Activated - Troubleshoot...872
Charge Alarm Indicator Is Illuminated - Troubleshoot...875
Fuel Gauge Reads Low or Gauge Does Not Move - Troubleshoot...880
Fuel Gauge Reads High or Gauge Quickly Moves Beyond Operating Range - Troubleshoot...883
Engine Coolant Temperature Gauge Reads Low or Gauge Does Not Move - Troubleshoot...886
Engine Coolant Temperature Gauge Reads High or Gauge Quickly Moves Beyond Operating Range - Troubleshoot...890
Hydraulic Oil Temperature Gauge Reads Low or Gauge Does Not Move - Troubleshoot...893
Hydraulic Oil Temperature Gauge Reads High or Gauge Quickly Moves Beyond Operating Range - Troubleshoot...897
Engine Speed Does Not Respond to Engine Speed Dial - Troubleshoot...900
Low Idle System Does Not Respond to Low Idle Switch - Troubleshoot...902
Low Idle Indicator Does Not Respond to Low Idle Switch - Troubleshoot...909
Engine Speed Dial Does Not Work - Troubleshoot...913
Governor Actuator - Troubleshoot...921
Timer - Troubleshoot...930
Circuit 332-BU - Troubleshoot...934
Circuit 303-BR - Troubleshoot...938
Controller - Troubleshoot...943
Engine Stalls - Troubleshoot...949
No Power - Troubleshoot...955
Implement Pressure Switch - Troubleshoot...958
Travel Alarm Does Not Sound - Troubleshoot...962
Travel Alarm Sounds while Travel Controls Are Released - Troubleshoot...966
Travel Pressure Switch - Troubleshoot...969
Speed Sensor - Troubleshoot...974
Charging System - Test...979
Calibration Mode - Enter...995
Governor Actuator - Check...1000
Governor Actuator - Calibrate...1003
Proportional Reducing Valve - Calibrate...1005
Monitor - Disassemble...1007
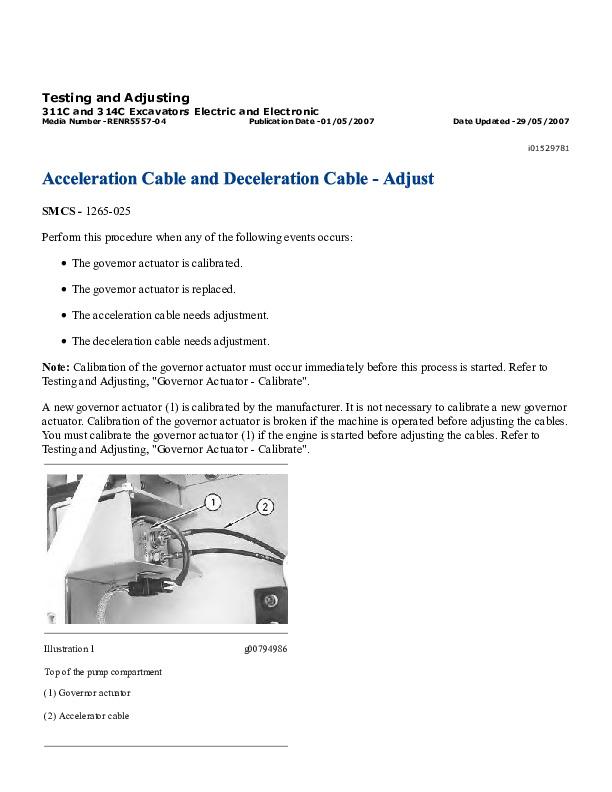
Acceleration Cable and Deceleration Cable - Adjust...1015
Speed Sensor - Replace...1018
ISJ HEX COMMONALITY CHART CLK00001-UP (MACHINE)(SEBP5600 - 00) - Documentation...1020
Controller Connector Contact Identification...1021
System Schematic...1023
Caterpillar 311C Excavator Repair Service Manual
![]()