
John Deere Hay and Forage Rotary Platforms Models 994 (4 and 4.5 Meter) Diagnosis & Repair Service Manual (TM2051)
Complete Diagnosis & Repair Service manual for John Deere Hay and Forage Rotary Platforms Models 994 (4 and 4.5 Meter), with all the shop information to maintain, diagnose, repair, and rebuild like professional mechanics.
John Deere Hay and Forage Rotary Platforms Models 994 (4 and 4.5 Meter) workshop Diagnostics & Repair manual includes:
* Numbered table of contents easy to use so that you can find the information you need fast.
* Detailed sub-steps expand on repair procedure information
* Numbered instructions guide you through every repair procedure step by step.
* Notes, cautions and warnings throughout each chapter pinpoint critical information.
* Bold figure number help you quickly match illustrations with instructions.
* Detailed illustrations, drawings and photos guide you through every procedure.
* Enlarged inset helps you identify and examine parts in detail.
TM2051 - John Deere John Deere Hay and Forage Rotary Platforms Models 994 (4 and 4.5 Meter) Technical Manual (Diagnosis & Repair).PDF
TM2051 - John Deere John Deere Hay and Forage Rotary Platforms Models 994 (4 and 4.5 Meter) Technical Manual (Diagnosis & Repair).EPUB
Total Pages: 423 pages
File Format: PDF/EPUB/MOBI/AZW (PC/Mac/Android/Kindle/iPhone/iPad; bookmarked, ToC, Searchable, Printable)
Language: English
MAIN SECTIONS
Foreword
Service Technician Response
General
Safety
Specifications
General Information
Lubrication
Platform Drives
General Information
Diagnosing Malfunctions
Driveline Repair
Cutterbar-Conditioner Gear Case
Roll Drive Gear Case (Roll Conditioner)
Belt Drives
Cutting Components
General Information
Diagnosing Malfunctions
Cutterbar Repair
Disks and Knives
Platform
General Information
Diagnosing Malfunctions
Platform Repair
Conditioner
General Information
Diagnosing Malfunctions
Roll Arms and Bearings
Rolls
Impeller
Electrical System
General Information
Connector Repair
Dealer Fabricated Tools
Dealer Fabricated Tools
TABLE OF CONTENTS......1
Section 10: General......11
Group 05: Safety......11
Recognize Safety Information......14
Understand Signal Words......15
Follow Safety Instructions......16
Handle Fluids Safely—Avoid Fires......17
Prepare for Emergencies......18
Handle Chemical Products Safely......19
Avoid High-Pressure Fluids......20
Park Machine Safely......21
Support Machine Properly......22
Wear Protective Clothing......23
Work in Clean Area......24
Service Machines Safely......25
Work In Ventilated Area......26
Illuminate Work Area Safely......27
Replace Safety Signs......28
Use Proper Lifting Equipment......29
Stay Clear of Rotating Driveline......30
Remove Paint Before Welding or Heating......31
Avoid Harmful Asbestos Dust......32
Avoid Heating Near Pressurized Fluid Lines......33
Practice Safe Maintenance......34
Practice Safe Service Procedures......35
Use Proper Tools......36
Construct Dealer-Made Tools Safely......37
Dispose of Waste Properly......38
Live With Safety......39
Group 10: Specifications......384
994 Rotary Platform Specifications (Specifications and design subject to change without notice.)......11
Metric Bolt and Screw Torque Values......46
Unified Inch Bolt and Screw Torque Values......48
Group 15: General Information......12
Machine Description......51
Product Identification Numbers......52
Platform Serial Number......53
Metric And Customary Design......54
Repair Components......55
Unauthorized Modifications......56
Platform Lift Lockout......57
Care Of V-Belts......58
Tighten Bearing Locking Collar......59
Group 20: Lubrication......12
Grease......61
Cutterbar Oil......62
Gear Case Oil......63
Alternative and Synthetic Lubricants......64
Mixing of Lubricants......65
Lubricant Storage......66
Perform Lubrication and Maintenance......67
Section 20: Platform Drives......79
Group 05: General Information......68
994 Rotary Platform......72
Group 10: Diagnosing Malfunctions......308
Platform Drives......79
Group 15: Driveline Repair......68
Other Material......410
Service Parts Kits......106
Specifications......384
Repair Cutterbar U-Joint Coupler......88
Remove and Install Upper Roll Driveline (Roll Conditioner)......92
Remove and Install Lower Roll Driveline (Roll Conditioner)......94
Repair Upper and Lower Roll Drivelines (Roll Conditioner)......96
Replace Platform Driveline Coupler......100
Group 20: Cutterbar-Conditioner Gear Case......68
Essential or Recommended Tools......409
Service Equipment and Tools......314
Other Material......410
Service Parts Kits......106
Specifications......384
Remove and Install Cutterbar-Conditioner Gear Case......108
Disassemble Cutterbar-Conditioner Drive Gear Case (Iberica)......112
Disassemble Cutterbar-Conditioner Drive Gear Case (Comer)......120
Inspect Cutterbar-Conditioner Gear Case (Iberica)......127
Assemble Cutterbar-Conditioner Gear Case (Iberica)......129
Assemble Cutterbar-Conditioner Gear Case (Comer)......142
Repair Gear Case Quill (Impeller Conditioner)......151
Group 25: Roll Drive Gear Case (Roll Conditioner)......68
Service Equipment and Tools......314
Other Material......410
Specifications......384
Remove and Install Roll Drive Gear Case......156
Disassemble Roll Drive Gear Case......158
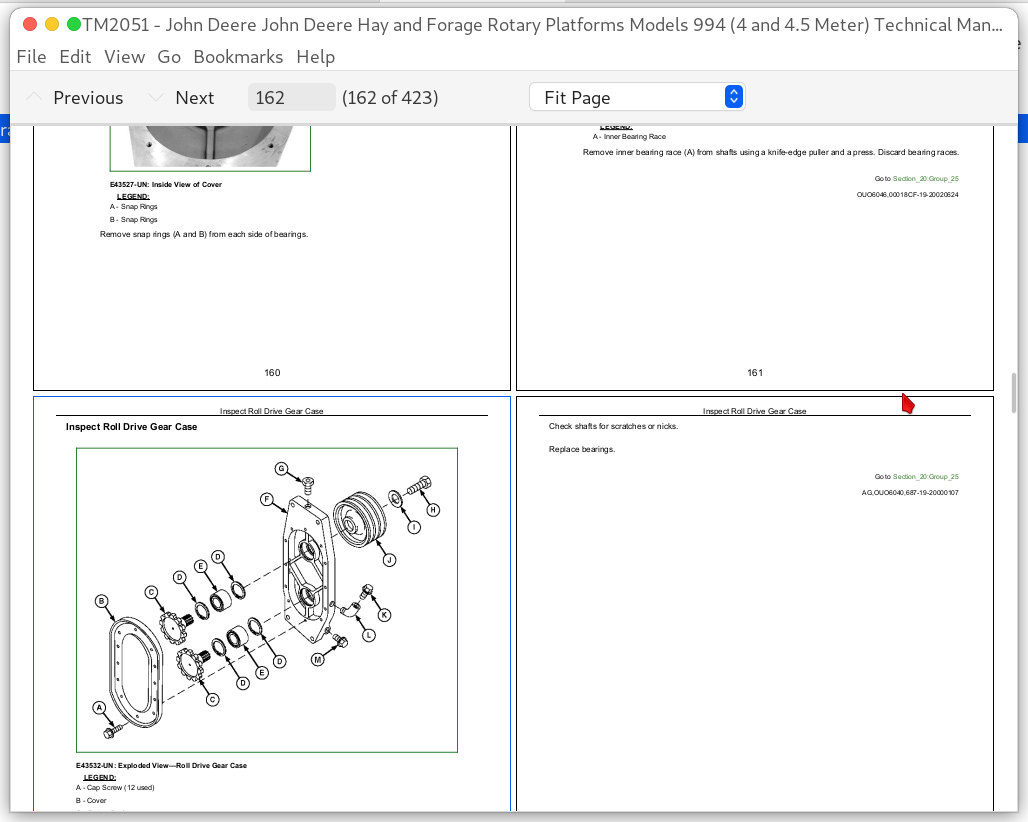
Inspect Roll Drive Gear Case......162
Assemble Roll Drive Gear Case......164
Group 30: Belt Drives......69
Specifications......384
Replace Conditioner Drive Belt—Roll Conditioner......170
Adjust Conditioner Drive Belt Tension—Roll Conditioner......174
Replace Conditioner Drive Belt—Impeller Conditioner......176
Adjust Conditioner Drive Belt Tension—Impeller Conditioner......179
Section 30: Cutting Components......180
Group 05: General Information......180
Cutterbar Description......183
Group 10: Diagnosing Malfunctions......308
Diagnose Cutterbar Malfunctions......189
Group 15: Cutterbar Repair......180
Service Equipment and Tools......314
Other Material......410
Specifications......384
Remove and Install Cutterbar Modules......198
Repair Cutterbar Modules......201
Repairing a Dented Module......204
Remove and Install Cutterbar......206
Remove Idler Gear Bearing From Idler Gear......214
Remove and Install Left-Hand End Quill Assembly......220
Remove and Install Right-Hand End or Intermediate Quill Assemblies......222
Cutterbar Quill and Pinion Gear Timing Detail—Disks Rotate Towards Center (4 Meter)......225
Cutterbar Quill and Pinion Gear Timing Detail—Disks Rotate Towards Center (4.5 Meter)......228
Cutterbar Quill and Pinion Gear Timing Detail—Alternating Disk Rotation (4 Meter)......231
Cutterbar Quill and Pinion Gear Timing Detail—Alternating Disk Rotation (4.5 Meter)......234
Disassemble and Assemble Quill Assembly......237
Replace Left-Hand End Disk Driver......242
Replace Intermediate Disk Drivers......246
Replace Right-Hand End Disk Driver......250
Adjust Lower Crop Shields......256
Group 20: Disks and Knives......180
Specifications......384
Remove Disks......260
Install and Synchronize Disks......262
Check Knives......263
Check Knife Wear......265
Remove Knives......268
Install Knives......270
Replace Wear Shield On Knife Bolt......273
Replace Crop Accelerator......274
Section 40: Platform......276
Group 05: General Information......276
Platform Description......278
Settings for Various Crop Conditions......279
Group 10: Diagnosing Malfunctions......308
Diagnosing Platform Malfunctions......285
Group 15: Platform Repair......276
Remove and Install Gauge Shoes......292
Remove and Install Forming Shields......294
Remove and Install Swathboard......296
Remove and Install Conditioning Hood (Impeller Conditioner)......298
Section 50: Conditioner......299
Group 05: General Information......299
Conditioner Description......302
Group 10: Diagnosing Malfunctions......308
Diagnosing Malfunctions......308
Group 15: Roll Arms and Bearings......299
Service Equipment and Tools......314
Other Material......410
Specifications......384
Remove And Install Upper Roll Arm—Left-Hand Side......317
Remove and Install Upper Roll Arm—Right-Hand Side......321
Replace Upper Roll Arm Bearing......324
Replace Lower Roll Bearing—Left-Hand Side......325
Replace Lower Roll Bearing—Right-Hand Side......328
Group 20: Rolls......299
Other Material......410
Specifications......384
Remove Rolls......333
Install Urethane Rolls......341
Install Tri-Lobe Rolls......348
Install V-10 Rolls......354
Adjust Roll Alignment......360
Adjust Roll Timing......365
Adjust Conditioner Roll Pressure......369
Adjust Conditioner Roll Spacing—Earlier Machines......372
Adjust Conditioner Roll Spacing—Later Machines......375
Shaft Replacement......380
Group 25: Impeller......299
Specifications......384
Remove and Install Impeller......385
Replace Impeller Bearing—Left-Hand Side......390
Replace Impeller Bearing—Right-Hand Side......393
Change Impeller Speed......395
Section 60: Electrical System......397
Group 05: General Information......397
Platform Electrical System Description......399
Platform Wiring Harness Diagram (Model Year —2009)......400
Platform Wiring Harness Diagram (Model Year 2010— )......402
Wiring Harness Adapter (Model Year 2010— )......404
Warn/Turn Light Jumpers......406
Group 10: Connector Repair......397
Essential or Recommended Tools......409
Other Material......410
Electrical Connector Handling......411
Use Contact Cleaner and Di-electric Grease......412
Replace WEATHER PACK WEATHER PACK is a trademark of Packard Electric. Connector......397
Install WEATHER PACK WEATHER PACK is a trademark of Packard Electric. Contact......397
Replace METRI-PACK (Push Type) Connectors......417
Harness Repair—Splice Connector......418
Section 99: Dealer Fabricated Tools......419
Group 05: Dealer Fabricated Tools......419
DFEX1830A Backlash Measuring Strap......421
John Deere John Deere Hay and Forage Rotary Platforms Models 994 (4 and 4.5 Meter) Diagnosis & Repair Service Manual (TM2051)
![]()